Showing posts with label OPI. Show all posts

Wednesday, April 24, 2013

Around the World Giveaway!

I don't think many of you read my post yesterday, but if you did you would know that I was planning on a giveaway. I was planning on saving these items for later but it came in the mail came today and I'm impatient. My favorite part of Christmas has always been the giving part, I get super excited to give my friends and family stuff. I consider you guys my nail art friends, so I couldn't wait to give you something! Plus this might make the Around the World Challenge a little more fun.

Rules:
1. International, but if you know that where you live it may be prohibited please do not enter.
2. You must be 18 to enter or have your parents permission (seriously though are your parents really going to mind you getting free stuff).
3. Winner will be chosen when the giveaway ends, they have 48 hours to respond or a new winner will be chosen.
4. Please no cheating! Not cool bro.

Ok now that that's out of the way how about we see the prizes hmm?

First up is a OPI Mini travel set. It comes with this carrying case, OPI Nail Envy Base Coat, OPI Rapid Dry Topcoat, OPI Chip Skip, OPI Expert Touch nail polish remover, and nail wipes.


If you were wondering just how "mini" mini is.
 Then to keep those nails in good shape while you're on the road, there is the Trim nail care travel kit. It includes a nail file, orange stick, two sizes of clippers, and tweezers.


Good luck! :D

a Rafflecopter giveaway

Monday, March 25, 2013

Golden Orange

Instead of the Golden Apples from The Garden Hesperides, today we have the Golden Orange. Because nymphs need citrus too. 


This is a very bright update I did later to the plain orange polish I wore out a while ago, its kind of the opposite to this manicure. I used paper reinforcers from Staples to get the half-moons, and it made life waaay easier from what I was doing before. I will need some practice to get all of them even though.


I used:
Revlon Infamous
OPI Rising Star


Wednesday, March 6, 2013

Money Smart Nail Art- Cork Stamp

Hey guys! Guess what?! This is my first ever tutorial! It's for Moneysupermarket.com's Money Smart Nail Art contest, basically to create a money saving nail art look and post how you did it, so let's get right into it shall we? I'm excited! 

So first I want to warn you that this will be very picture heavy, I'm a very visual person so my tutorials will tend to be this way. I know there are TONS of ways to save money with nail art, using bobby pins or sewing pins as dotting tools, old liquid eyeliner brushes as striping brushes, ect. I wanted to come up with something a little bit more for a unique look, and I just love when you can take something you're going to throw away anyways and revamp/repurpose it. So I came up with the idea to use old wine bottle corks as nail stampers, kinda a twist on what you did when you were in kindergarten to wrap presents for your mom. 


First of all you're going to need corks of course. I took these out of my parent's cork holder in the kitchen. Try to pick ones that have flat bottoms, and don't use those weird foam corks. If you're not a drinker or underage (like me) without access to wine corks don't worry, you can get sparkling cider or something of the like, it's super yummy. 


Start by drawing out what you want your stamp to look like, and take into account that a cork is more than likely bigger than your nail.


I would recommend using an exacto-blade set like this to carve your pattern out, but if you don't have one of those around the house try using a regular exacto-blade before you bust out the steak knife. Please be careful, cutting off your finger is going to be counter-producive.


I decided to just stick with the star design, I thought it was the most interesting. Make sure the grooves in your design are very deep so you get a clear stamp. 


Take a minute to get yourself a soda because being all crafty like Martha Stewart is hard.


Paint on your basecoat, I painted my nails with two coats of Pure Ice's Platinum Magic Basecoat.


Next you will need acrylic paint, you can find it pretty much anywhere really cheap, I'm using Blick's generic brand. I highly recommend using acrylic instead of nail polish, it worked much better in all of my trials and it will make clean up a whole lot easier.


Spread your paint evenly on your pallet so you get good coverage on your stamp.


Press your stamp lightly into the paint, you might need to press it onto your pallet once or twice before applying it to the nail so you get any excess paint off. You don't want it to be all gloopy.


Stamp the first layer of paint on, you will need to roll the stamp around on your nail a bit to get full coverage. 


Second layer of paint.


 Now apply a generous amount of topcoat once the acrylic has dried, since acrylic is water soluble it will wash away the first time you take a shower. I used OPI Rapid Dry.  Wait a decent amount of time before proceeding to the next step, really let the topcoat dry. Maybe get dinner, I chose a burger from Sonic.


Wash off the paint in warm water with soap. Use a washrag to gently rub it off, you don't wan to scrub and damage your cuticles. Protip: don't use a washrag you're keen on, acrylic stains fabrics forever. Seriously that stain will still be there after the end of humanity.


You're all done! After some thought this look reminds me of when I would play with the ketchup and mustard on my plate as a kid instead of eating my food. You can use lots of different colors and as many layers as you like, also experiment with the amount of paint for different outcomes. I hope you liked my first tutorial, let me know what you thought in the comments. Too many pictures? Too little detail? I'd love to improve! See you guys tomorrow :)

Saturday, January 26, 2013

Night Light

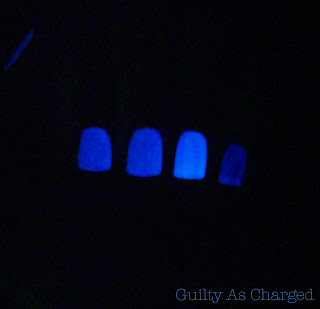
Today I'm very excited to share Born Pretty's glow polish in color #2. 


Over all nails I have two coats of #2 with no topcoat, with the exception of my index finger which has one coat of OPI Insti Dry.


On my ring finger #2 is layered over two coats of Maybelline Green With Envy with the added top coat, middle finger is the same but with no top coat, ring finger has two coats of NYC French Tip White under #2, and my pinky just has #2.


#2 glows best over the white and the top coat seems to have no effect on the glow.


The glow has to be "charged up" under a light before it will really glow, wearing it around won't do it. The glow lasts for about half an hour after exposure to light.


This is all over Green With Envy. My final thought is that this is a decent enough glow polish. Application was easy and drying time wasn't long. Removal isn't hard, the polish is a bit gritty and leaves a strange feel to your nails even with a basecoat. I just wish it didn't need to have direct light to get the effect of glowing :\.

Wednesday, January 9, 2013

Polish Days- Something New

I'm really excited to share this manicure with you, this one turned out great! This is for Polish Days January, and this month's theme is something new. Whether its a new technique, polish, stamp, decoration, ect. I killed two birds with one stone on this one, this is both a new style I have never tried before, and a brand new polish!


The new style is called Ruffian, its like a backwards moonicure. I have seen this styles loads of times, but only recently learned the name for it from Chalkboard Nails. The new polish is Revlon first class, a gorgeous creme blue. For the sliver of gold I used OPI Rising Star. And there's one more new thing...


A blue dress that matches the polish! I thought it was quite serendipitous when I realized they matched so well. This is the dress I wore to that new years dance I told you about, I guess I got three birds with this post!  


So tell me girls, what are some new nail polish trends you're excited to try in 2013? :)


Monday, January 7, 2013

OPI Burlesque Little Teasers

Hello chickas! If you were on holiday break these past weeks, how was your first day back to work?school? Mine was alright, and now that school has stared up again I'm going to try to keep posting on a regular schedule. So it won't be oh-my-gosh-a-zillion-posts-in-five-minutes like over break, but it also wont be cricket-cricket for a couple days anymore, I'm going to at least try to post once a day or every other day.


So here we have OPI's Burlesque Little teasers collection, aren't the tiny bottles adorable ^-^? I've been wanting The Show Must Go On ever since I got a pedicure with it, but everywhere online a full bottle could be raher pricey, for the item AND shipping. But I found this collection on eBay for five dollars (and I think s&h was two or three dollars) and I was sold. It had the color I wanted and some other fun colors too, why not?


 The first color is Rising Star, a shimmery gold color. All of the polishes in this collection were rather sheer and took about three coats to get to opaqueness I wanted. I myself don't wear gold too often, I mostly stick to silver with jewelry. But I think Rising Star will be nice for some nail art.


Next is Take the Stage, a gorgeous coppery orange color. All of these polishes have a shimmer to them, I just can't seem to get enough shimmers can I? This polish really reminds me of fall, not so much the leaves but just the general color that comes to mind with fall.


Shown here is Ali's Big Break, a very pretty red with a subtle shimmer. I don't have many reds, and none a shimmer, so this is a nice addition.


Lastly is the long anticipated The Show Must Go On! which after reading the description on the box is kinda pinkish, which is fine by me. I've been wearing this one all day and in different lighting it can appear red, pink, or orangey with a yellow shimmer. All in all just a gorgeous color, and I may have to spring for a full size bottle when this mini one runs out, or just be very conservative.

So what do you think? Would you buy/wear any of these polishes?

Saturday, January 5, 2013

Moon Flower

Have you ever seen moon flowers? They're a gorgeous plant who's blooms only open up once the moon rises, and then they wilt when then sun rises to be replaces by new blooms the next night. They're fascinating to watch, my Grandma has some in her front yard. Anyways, I've lost track of the days again, but I know it supposed to be half moons, or as The Daily Nail calls them, moonicures.


Moonicures themselves are pretty cool, but I prefer when they are fancied up. I thought semi-stamping one part would be neat, and I was right. Definitely a technique I'll be using again.

I used:
Sally Hansen Gone Grey
NYC French Tip White
OPI Suzi and the 7 Düsseldorfs
BM-323

What a Stud

You must be tired of my pun titles xD. Anyways, my studs from Polish Me To Go arrived yesterday and I had to play with them. Instead of posting spererate posts for each look I thought I would just put them all here together.


For the first one I used OPI Suzi and the 7 Düsseldorfs as a base. I kept this one really simple because I was going out with friends to First Friday last night and didn't have much time for something elaborate, and the stud is quite large. I also photographed this last night with my parent's camera, which annoys the hell out of me. I can't get it to focus and there's seemingly no way to turn off the flash, resulting in an odd photo quality. Anyways, I really like this stud  and it stayed on with just one coat of topcoat applied under it. I used this method with all of the studs or I just stuck them directly onto the wet polish, they hold on really well and don't sit too awkwardly on the nail. 


Yay my camera was charged for usage again for the rest of the photos! I really like the gold and pink in this one, it seems girly yet professional in a way. I think that using silver would have detracted from the look. I used NYC Pink Promenade as a base here.


Like how I only did accent nails? It seems to be my thing. I always think that accessories make the outfit and I guess an accent nail is the accessory of nail art. I used Venique Rolling tides as a base.


Also with the studs came some little rhinepebbles, which I totally wasn't expecting and was a nice surprise. What was really great about this set is that it came with a great variety of studs, enough of them to do actual designs (where some I've seen come with like three of each kind), and it didn't cost me a fortune. I think in total I payed four bucks for them with shipping and handling. Great quality too, AND they arrived super fast! Anyways before I start sounding like an ad campaign lets get back to the actual nail art. I really loved this one, the pink polish and rhinepebbles made in girly but the studs toughned it up, things I like to do in my everyday wardrobe. Like I'll wear a really frilly flowery dress and put it with a leather jacket and boots. The base color here was Essie Tart Deco, a new fave of mine. Oh, and it didn't show very much in the picture but the rhinepebbles glitter little rainbows in the light, how great is that?


THIS. TOOK. FOREVER. OMG. I really really wanted to do a stud flower but they just would not sit right. And then you can't scoot them around because it smears the polish -__-. It's my fault for being a perfectionist, but I wanted it to be just so, and after a gazillion (ok three) tries I got it perfectly ^-^. I think due to the effort this is my fave look. Base color is Maybelline Green With Envy.

So tell me guys, what was your fave look? And have I convinced you to try studs if you already haven't?

Wednesday, December 26, 2012

Inclusion

So this is a half swatch half nail art post. If you've seen my Instagram your know that I got a ring I've been wanting for quite some time from my parents for Christmas. This ring is so gorgeous and I love it so much I just had to dedicate some nail art to it.


I am in l-o-v-e with The Living daylights. My brother must be physic to know how bad I've wanted this polish.


I saw this ring I don't know how long ago, I think it was over the summer. That sounds about right. The funny thing is the day before Christmas I was at the mall getting some last minute shopping done and Santa photos, and I dragged Dad into Neimen Marcus to see it, but It was gone. Now I know why xD.


The ring is from Louis Vuitton's Inclusion collection.


I used:
Pure Ice Magic Platinum Basecoat
OPI The Living Daylights
Maybelline Bold Gold
Sally Hansen Black Out

OPI- Suzi & the 7 Düsseldorfs

Look, another shimmer! But this time from a familiar brand.


Of course OPI's application was flawless, and the color is very pretty. The only thing is I already techinically have this color, its pretty much exactly like Sally Hansen's Pronto Purple. I love it anyways though, the more the merrier ^-^.